

Worn, loose, or dated cabinet handles do more damage to your kitchen’s appearance than most homeowners realize. The good news is that you can replace cabinet door handles yourself in a single afternoon, without a contractor, and without spending hundreds of dollars. Professional handle installation costs between $31 and $49 per handle, which adds up fast in a full kitchen. This guide covers everything from tools and measuring to drilling, installing, and troubleshooting, so you get clean, professional results the first time.
Table of Contents
Key takeaways
| Point | Details |
|---|---|
| DIY saves real money | Professional installation runs $165 to $518 per job; doing it yourself costs a fraction of that. |
| Measure before you drill | Center-to-center measurement and batch marking prevent misaligned holes across all your cabinet doors. |
| Use a hardware jig | A drilling template produces consistent, professional placement that freehand marking rarely achieves. |
| Tape prevents splintering | Painter’s tape over the drill site protects cabinet surfaces during drilling. |
| Fix mistakes with filler | Wood filler and decorative backplates can cover any misdrilled holes cleanly. |
Replace cabinet door handles yourself: tools and prep
Before you touch a single screw, get everything organized. A well-prepared workspace is the difference between a clean install and a frustrating one.
Tools you will need:
-
Cordless drill with adjustable clutch
-
Drill bits (standard phillips head)
-
Phillips and flathead screwdrivers
-
Tape measure
-
Pencil or marking awl
-
Level or laser level
-
Painter’s tape
-
Wood filler and fine-grit sandpaper (for repairs)
-
Cabinet hardware jig or template
Materials checklist:
| Item | Purpose |
|---|---|
| New cabinet handles or knobs | The replacement hardware itself |
| Matching screws | Often included with handles; verify thread size |
| Decorative backplates (optional) | Cover old holes or add a layered look |
| Wood filler | Repair any misdrilled or old holes |
| Painter’s tape | Protect cabinet surface during drilling |
Start by removing your old handles. Unscrew them from inside the cabinet door and pull them free. If they are stuck from years of paint buildup, use a flathead screwdriver wrapped in tape to gently pry them loose without scratching the surface.
Wipe down each door with a damp cloth before marking anything. Grease and residue from cooking can cause your pencil marks to smear, which throws off your measurements. Keep your workspace clear so you can move from door to door without knocking anything over.
Pro Tip: Check whether your new handles use the same screw hole spacing as the old ones. If the center-to-center distance matches, you may not need to drill new holes at all, saving significant time and repair work.
Measuring and planning handle placement
This is where most DIY cabinet handle replacements go wrong. Rushing the measuring phase leads to holes that are off by a few millimeters, and that small gap is visible once the handle is installed.
Center-to-center measurement is the most critical dimension for pull handles. It refers to the distance between the two screw hole centers. Standard sizes like 96mm, 128mm, and 160mm are common, and matching your new handle to the existing spacing means zero new drilling.
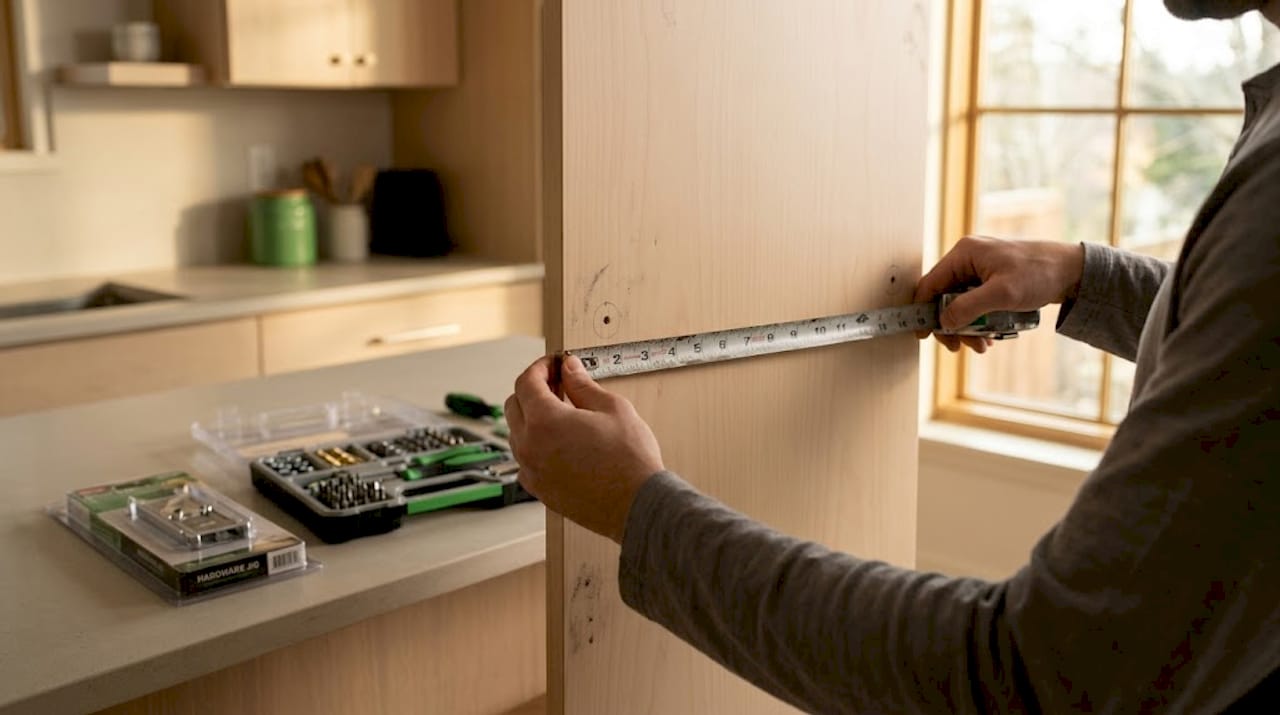
For placement on doors without existing holes, follow the industry standard for ergonomic and aesthetic consistency: upper cabinet handles should be positioned approximately 63.5 to 76.2 mm from the bottom corner of the door, while lower cabinet handles should be placed about 63.5 to 76.2 mm from the top corner, aligned with the side edge. This placement ensures a natural reach for users, minimizes strain, and creates a visually pleasing, uniform diagonal line across all your cabinetry, enhancing both functionality and design harmony in your kitchen or cabinetry layout.
For drawers, the one-third rule works well. Choose a handle length that is roughly one-third the width of the drawer front. This creates visual balance and gives you a comfortable grip.
Key placement steps:
-
Measure and mark the first door carefully, then use it as your reference point
-
Transfer measurements to a hardware jig or template for repeatable results
-
Use a level to confirm your marks are perfectly horizontal before drilling
-
Mark all doors and drawers before drilling a single hole
That last point is critical. Batch your marking phase before drilling so you can catch inconsistencies early and adjust without consequence. Once you start drilling, corrections require filler and repainting.
Pro Tip: Invest in a dedicated cabinet hardware jig. These inexpensive tools clamp directly to the door corner and have preset hole guides for the most common handle spacings. They take the guesswork out of placement entirely and pay for themselves on the first kitchen.
How to drill holes and install new handles
With your marks confirmed and your tape in place, you are ready to drill. Work through this process methodically, one door at a time.
-
Apply painter’s tape. Place a strip of painter’s tape directly over each pencil mark. This reduces splintering when the drill bit breaks through the surface. It also keeps your marks visible.
-
Select the right drill bit. A 3/16-inch bit is standard for pilot holes when installing cabinet hardware. This size matches most handle screw diameters and prevents the wood from splitting.
-
Clamp your jig firmly. If you are using a hardware template, clamp it securely before drilling. An angled hole makes handle mounting unstable or impossible to correct without filling and redrilling.
-
Drill slowly and perpendicular. Hold your drill at a 90-degree angle to the cabinet face. Use a slow speed setting. Let the bit do the work. Forcing it increases the chance of tear-out on the back side of the door.
-
Back up the door surface. Place a scrap piece of wood behind the drill site if possible. This prevents blowout on the interior face of the cabinet door, which is visible when the door is open.
-
Insert screws from inside the cabinet. Thread the screws through the door from the inside, then hand-thread the handle onto the screws from the outside. This keeps everything aligned before you tighten.
-
Tighten carefully. Use a screwdriver, not a power drill, for the final tightening. Over-tightening strips the screw holes or cracks the cabinet face. Snug is enough.
-
Check alignment after each install. Step back and look at the handle from a distance before moving to the next door. Small corrections are easy now. They are much harder after you have done twenty doors.
Even small irregularities in hardware placement drastically reduce perceived quality. Using templates elevates DIY installs closer to professional results.
Pro Tip: If your cabinet doors are hollow-core or thin, use machine screws with barrel nuts instead of standard wood screws. They distribute clamping force across a wider area and hold far more securely over time.
Troubleshooting mistakes and finishing touches
Mistakes happen. A hole drilled 5mm off-center is not the end of the project. Here is how to fix the most common issues cleanly.
Misdrilled holes. Fill incorrect holes with wood filler, let it cure fully (usually 24 hours), sand smooth, touch up the paint or finish, and then redrill. Do not rush the curing time. Drilling into undercured filler creates a crumbly mess.
Visible old holes. If your new handles do not cover the original holes, decorative backplates solve the problem instantly. They sit flat against the cabinet face and hide gaps up to an inch wide. They also add a layered, intentional look that reads as a design choice rather than a repair.
Uneven handle height. If one handle sits noticeably higher than its neighbors, remove it, fill the holes, and use your jig to remark. A level placed across two adjacent handles will confirm whether the issue is the mark or the drilling angle.
Loose handles after installation. Check that the screw is fully threaded into the handle post. If the hole has stripped, fill it with a toothpick and wood glue, let it dry, and re-drive the screw. It sounds low-tech, but it works reliably.
Pro Tip: Do a final functionality test on every door and drawer after installation. Open and close each one several times. A handle that feels slightly loose under normal use will work itself free within weeks.
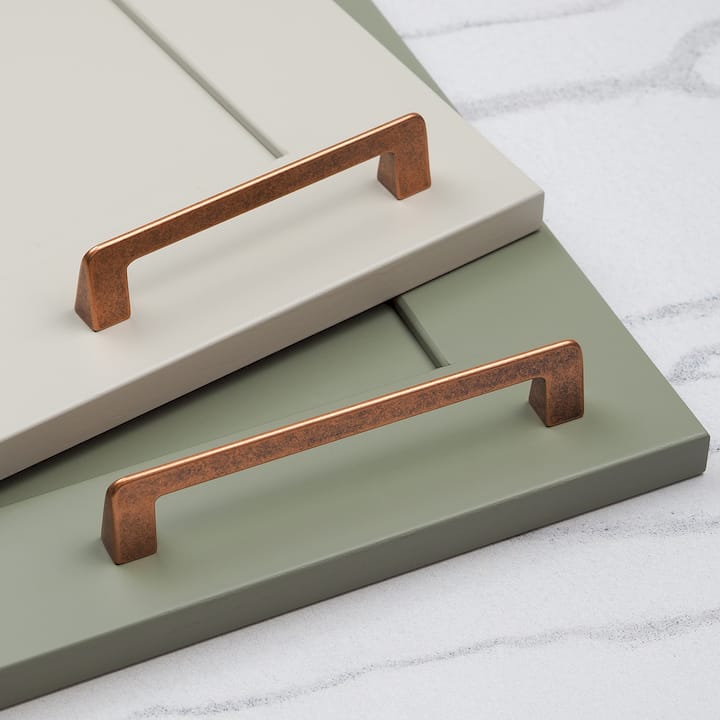
Choosing the right handle style and finish
The hardware you choose shapes how the entire kitchen reads. Getting the style right matters as much as the installation.
| Handle type | Best for | Finish options | Durability |
|---|---|---|---|
| Bar pulls | Modern and transitional kitchens | Brushed nickel, matte black, brass | High |
| Cup pulls | Shaker and farmhouse styles | Bronze, chrome, antite brass | High |
| Knobs | Upper cabinets, classic kitchens | Ceramic, metal, glass | Medium to high |
| Lip pulls | Handleless and minimalist designs | Brushed brass, stainless | High |
| Circular handles | Contemporary and bold designs | Brushed nickel, matte | High |
Material considerations:
-
Metal handles (stainless steel, zinc alloy, solid brass) are the most durable and easiest to clean. They suit high-use kitchens well.
-
Glass and ceramic knobs add visual interest but are more fragile. Best for upper cabinets with lighter use.
-
Wood handles bring warmth but require sealing and occasional maintenance in humid kitchen environments.
For finish selection, brushed and matte finishes hide fingerprints far better than polished chrome. If your kitchen sees heavy daily use, a brushed brass handle or matte black option will look clean longer between wipes.
Match your handle finish to at least one other fixed element in the kitchen, such as your faucet, light fixtures, or appliance trim. You do not need to match everything, but one coordinating finish ties the room together without effort.
For sizing, the one-third rule applies to pulls on drawers. On cabinet doors, a single knob or a short pull (96mm to 128mm) works for most standard door widths. Larger doors above 600mm wide benefit from longer pulls that give a more proportional grip.
My take on DIY cabinet handle replacement
I have seen homeowners spend weeks planning a kitchen renovation and then rush the hardware installation in an afternoon. That is almost always where the project loses its polish.
In my experience, the measuring and templating phase feels tedious, but it is the only part of this project that cannot be undone easily. A drill hole is permanent until you fill and repaint. A careful pencil mark costs you nothing. I have watched skilled, capable people skip the jig because they trusted their eye, and the result was a row of handles that looked fine individually but drifted visibly across the run of cabinets.
The other thing I have come to believe strongly: upgrading kitchen cabinet hardware is one of the highest-return updates you can make to a kitchen without touching the cabinets themselves. New handles on well-built but tired cabinetry can make the whole room feel current and deliberate. It is not just about aesthetics. A handle that fits your hand well and sits at the right height makes the kitchen genuinely more pleasant to use every day.
My advice is to slow down on the prep, be precise with your template, and choose hardware that you will still like in five years. Trends move fast in kitchen design. Finishes like brushed nickel and matte black have shown staying power. Bold colors and novelty shapes tend to date quickly.
— Jessica
Find the right handles at Kitchenlibrary
When you are ready to upgrade kitchen cabinet hardware, the selection you choose matters as much as the installation itself. Kitchenlibrary carries a curated range of cabinet handles, pulls, and knobs built to professional standards, with finishes and sizing options that suit both modern and classic kitchens.
Browse options like the Ona Lip Pull in Dark Brushed Brass for a clean, minimal look, or the Barrington Bar Handle in Bronze for a warmer, classic finish. If you prefer knobs for upper cabinets, the Como Knob in Brushed Nickel is a reliable, timeless choice.
Every product at Kitchenlibrary is selected for durability, fit, and ease of installation. Whether you are replacing a single handle or refreshing an entire kitchen, you will find hardware that installs cleanly and holds up to daily use.
FAQ
What tools do I need to replace cabinet handles myself?
You need a cordless drill, a 3/16-inch drill bit, a tape measure, a pencil, painter’s tape, a screwdriver, and ideally a cabinet hardware jig for consistent placement. Wood filler and sandpaper are useful for any repairs.
How do I measure center-to-center distance for cabinet pulls?
Measure the distance between the centers of the two screw holes on your existing pull. Standard sizes include 96mm, 128mm, and 160mm. Matching this measurement to your new handle avoids drilling new holes entirely.
Can I fix a misdrilled cabinet handle hole?
Yes. Fill the hole with wood filler, let it cure for 24 hours, sand it smooth, touch up the finish, and redrill using a hardware jig. Decorative backplates can also cover old or mismatched holes without any repair work.
How much does professional cabinet handle installation cost?
Professional installation costs $31 to $49 per handle, with full project costs ranging from $165 to $518. Doing it yourself reduces that cost to the price of the hardware and a few basic tools.
Where should cabinet handles be placed on doors?
Upper cabinet handles go 64 to 76 mm from the bottom corner, and lower cabinet handles go 64 to 76 mm from the top corner, aligned from the side edge. This placement creates a natural reach and a consistent diagonal line across the cabinetry.

Comments (0)
There are no comments for this article. Be the first one to leave a message!